Tips & Fitting Advice
Below are a list of guides to help you choose the correct products for both you and your horse. We have tried to give as much information as possible but we understand that we probably haven't covered everything!
If you still have questions unanswered please call us on 01292 266267.
Choosing the Right Rug for your horse
The rug you choose should fit your horse as securely, safely and as comfortably as possible. This will ensure complete protection while giving you peace of mind that your horses clothing will stay in place, performing reliably all day long.
How to measure your horse for a rug
If you have a new horse or are just unsure which size rug your horse needs, using a tape measure (or a piece of string you can measure later) measure your horse from the centre of his chest, horizontally along his side finishing where you require the rug to finish. It is best to allow an extra 3" on top of this for turnouts in most cases, especially if the turnout has a neck cover. Stable rugs are usually correct at the measured size. Rugs are sized in feet and inches, every 3". If your horse is between sizes you are usually better to go up a size than down, unless the horse is narrow chested or petite. Ideally, an existing rug in the correct size can be measured all the way along the bottom edge to give the size required.
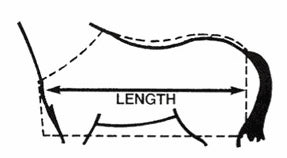
(Picture copyright BETA)
|
RUG SIZE (feet & inches) |
MEASUREMENT (inches) |
MEASUREMENT (cm) |
EU BACK SEAM (cm) APPROX |
|
4'3" |
51" |
130cm |
80cm |
| 4'6" | 54" | 137cm | 90cm |
| 4'9" | 57" | 145cm | 95cm |
| 5'0" | 60" | 152cm | 105cm |
| 5'3" | 63" | 160cm | 110cm |
| 5'6" | 66" | 168cm | 115cm |
| 5'9" | 69" | 175cm | 125cm |
| 6'0" | 72" | 183cm | 135cm |
| 6'3" | 75" | 191cm | 140cm |
| 6'6" | 78" | 198cm | 145cm |
| 6'9" | 81" | 206cm | 155cm |
| 7'0" | 84" | 213cm | 160cm |
Points to look for when fitting your horse rug
How can I tell if my horse's rug is too big or too small?
If the turnout or stable rug extends beyond the top of the tail (check when your horse has his head down too as often the rug will pull forward into the correct position when grazing, you can test this by asking the horse to lower using a treat), the rug is too big. If the rug does not reach the top of the tail, the rug is too small.
How should leg straps and surcingles be adjusted?
You should adjust leg straps and surcingles to allow a hands width between leg/belly and strap. If the leg straps and/or surcingles are not adjusted to allow a hand's width, your horse could get his legs caught in the straps if too long, or they may rub if too short.
How should the neck of the rug fit?
It is important to adjust the front straps on the rug to ensure that the top of the rug sits in front of the wither, not behind or it will pull back and and cause rubbing and sores on the shoulders, neck and withers. You should be able to easily get your hand down the front of the rug and it should be mobile enough to move forward and backwards over the horse's coat, wither and shoulders. If the neck of the turnout or stable rug is too big, the rug will probably also hang off the back of the horse, which will place pressure on the shoulders and increase the possibility of rubbing and slippage.
What rugs do I need?
Ideally, you should always have 2 turnout rugs for your horse, these can be different weights as thicker rugs can be layered underneath if necessary for the short term. Turnout rugs will often need longer than a few hours to dry, or could be ripped or damaged by the horse and need repairing so a spare is often a necessity. If your horse is stabled, you will need stable rugs as well are turnouts, and ideally a range if weights. An ideal sample horse wardrobe would be:
- 1 Light weight turnout (no fill or 100g max)
- 1 Medium weight turnout (approx 200g-250g)
- 1 Heavy weight turnout with optional neck cover (approx 300g +)
- 1 Medium weight stable rug
- 1 Heavy weight stable rug (with optional neck cover if draughty)
- 1 Fleece or similar cooler
- 1 Under rug
How to care for your horses rugs
A horses' rug is like any clothing article and should be hung to dry in a well ventilated, dry area if it is removed when it is still wet or damp. Occasionally, in prolonged and heavy rain, some moisture penetration may occur particularly in the sewn areas of the rug. This is not significant and due to the positioning of the stitching (particularly on seamless rugs) will not affect the rug's performance and is not a fault in any way.
Choosing the right bit for your horse
Firstly you will have to decide what bit you need? Bits are a minefield and with so many to choose from there is no guarantee to get it right first time. Below is a brief overview of the most popular types of bits available today and their actions which should allow you to make a more informed choice.
The Action of the Loose Ring
The most popular - the loose ring has much more movement and play than a fixed butt or cheek. It discourages fixing, blocking and leaning and encourages mouthing. It allows the mouthpiece more movement so that it may follow the angle of the tongue because the angle of the poll and the horse's overall outline changes through different work etc. A quality loose ring correctly fitted should not cause any nips or rubs.
The Action of the Eggbutt
This is a fixed cheek. Everything remains more still in the mouth and if a horse is lacking in the confidence to stretch into the contact, this may prove extremely beneficial.
The Action of the Baucher
When a contact is taken the upper arm is angled forwards causing the mouthpiece to lift - thereby suspending it in the mouth and reducing the pressure across the tongue and the bars - this is often beneficial for cases of over sensitivity. Any extension above the mouthpiece causes poll pressure - this in itself has a head lowering action. However, if the horse is going forward into a contact and active behind this will encourage a rounding action and help tremendously with the outline. This cheek is dressage legal as a Snaffle (on its own) or as a Bradoon used in conjunction with a Weymouth.
The Action of the Full Cheek
This reinforces the turning aids and providing the mouthpiece is the correct size (snug fit) will not allow the mouthpiece to slide back and forth across the tongue and bars thus reducing friction. If the upper cheek is fixed to the bridle cheekpiece with fulmer keepers this will fix the mouthpiece in the mouth and also give some poll pressure. The full cheek is very useful for starting babies especially if you do not have access to a safe working environment such as an indoor or outdoor school.
The Action of the D Ring
This would fall under the category of a fixed cheek - it also helps with the turning. The racing D cheek is bigger in order to prohibit the bit rings being pulled through the mouth. The D Ring is ideal for children or novice riders who are not always aware of the potential hazard of the full cheek.
The Action of the Universal
Any extension above the mouthpiece will cause poll pressure (head lowering), any extension below the mouthpiece will give leverage (head raising). When the two are combined this is generally referred to as a gag action. The gag action is not excessive and even strong horses generally appreciate this and respond as opposed to fighting it.
The cheeks are always attached to the small offset ring at the top - the top ring is angled very cleverly in order to avoid excessive cheek pressure.
- Gives some poll pressure and is usually acceptable for flatwork, etc.
- Gives a mild gag action.
- Roundings are employed reducing some gag action and allowing the use of one rein.
- Two reins to differentiate.
- A curb strap is used with the reins at any option but usually in conjunction with one rein on the bottom ring to maximise on the gag and curb action.
The Action of the English Gag (Running Gag - Lifting Action)
The recommendation is to ride on two reins. If you ride on two reins you can differentiate between the gag and the snaffle. It helps tremendously with brakes and outline and is often used on horses that are strong, heavy in front (on the forehand) or too deep (head too near the ground). It is available with rolled leather cheeks (aesthetically more pleasing) but not as fast in their action as our rope cheeks that slip back and forth through the rings much more quickly, giving a faster and more clearly defined aid. The eggbutt is referred to as the Cheltenham Gag, the loose ring is the Balding Gag (also referred to as the Polo Gag if the rings are larger), and the full cheek is known as the Nelson Gag which is a very popular show jumping cheek (aids turning).
The Action of the Pelham
The Pelham exerts pressure on the poll, the curb groove and the mouth. It is used extensively and is available in a variety of mouthpieces. The Pelham should always be employed with two reins for the show ring. Some horses dislike the curb action. If this is the case you can lessen the action with a rubber curb guard or elasticated curb.
The Action of the Beval Cheeks
The Beval is particularly popular with the show ponies, often used for lead rein and first ridden. It is not a severe bit although it offers a little more control and helps especially the child rider as it promotes outline, head carriage and responsiveness (it helps the child to bring the pony's nose in). It is available with a small, neat bradoon ring and is perfectly acceptable on the show pony's head.
The Beval cheeks have two settings:
- Gives some poll pressure and is usually acceptable for flatwork, etc.
- Gives the action of a mild gag.
The Mouthpiece
Jointed mouthpiece: applies pressure to the tongue, lips, and bars with a "nutcracker" action. This is the most common mouthpiece found on a snaffle.
Mullen mouth: made of hard rubber or a half-moon of metal, it places even pressure on the mouthpiece, lips, and bars. It is a very mild mouthpiece.
French link mouth: a double-jointed mouthpiece with a bone-shaped link in the middle. It reduces the nutcracker action and encourages the horse to relax.
Dr. Bristol: a double-jointed mouthpiece with a thin rectangular link in the middle that is set at an angle, creating a pressure point. The French link is similar but much gentler because the link in the middle is flat against the tongue, lips, and bar and has no pressure points. Neither the Dr. Bristol nor the French Link have a nutcracker action.
Roller mouthpieces: tend to make a horse relax their mouth and activate the tongue, encouraging salivation and acceptance of the bit. Also create a distraction for tense or nervous horses.
Hollow mouth: usually single-jointed with a thick, hollow mouthpiece which spreads out the pressure and makes the bit less severe. May not fit comfortably in some horses' mouths if they are a little small.
Waterford: This bit has a chain type mouthpiece which has 'ball shaped links' linked together, the bit is floppy and mobile in everyway, it is completely movable in all directions. The Waterford mouthpiece has proved one of the most popular bits for bitting problems such as leaning, taking hold of the bit, setting the jaw ect, when the horse tries to lean or take hold of the bit, the waterford mouthpiece collapses, thus the horse has nothing rigid to take hold of. The Waterford should be fitted ¼" to ½" larger than any other mouthpiece.
Rubber mouthpiece: Stainless steel bits can have quite a bitter taste to them which some horses don't particularly like. Rubber Mouthpieces are a warmer feel to the horse's mouth, those horses that do not accept stainless steel very well sometime accept rubber very well. The rubber mouthpiece is particularly useful for horses with sensitive bars and/or tongues. A mild alternative.
Sweet Iron Bits: Sweet Iron is a unique metal designed to encourage salivation and acceptance of the bit. As the metal oxidises it produces a sweet taste, something most horses take kindly to and this promotes relaxation in the mouth and acceptance of the bit.
What hat and how to pick the right one
The most important piece of clothing you'll need to buy is a riding hat which provides protection if you fall or get kicked. It's worth wearing it at all times while handling a horse as they can be unpredictable. All riding helmet manufacturers have to produce helmets to meet one of three international safety standards or marks - the PAS015:2011, the EN1384:1996/BSEN1384:1997 and ASTM F1163:04a - some may even produce helmets to meet all of them. As each standard tests for a different set of accident situations, helmets that meet multiple standards provide the most comprehensive protection and cover a wider range of potential accident situations.
It is important to know that not all hats fit the same likewise not all heads are the same shape! We strongly recommend that you are fitted by a qualified hat fitter but if you are unable here are some tips to help with your choice.
Measuring your head
To measure for a riding hat, you need to place the tape measure around your head, sitting just above your eyebrows, and leave one of your fingers inside the tape (against your head) to allow for when your head gets hot. This will give you your size in cm. Your helmet should fit snugly without being tight and should stay in place independent of the harness. Please note that you may need a different size hat or skull in a different make or model.
How to tell if your riding hat fits
You should put your hat on with your hair loose with no clips etc. to avoid any lumps and bumps that may effect the fit. When you put it on, it should go on with a little pressure, but not need to be forced. You should feel an even pressure all the way around, and not be aware of any extra pressure on the front or sides of your head. When the hat is rocked forwards and backwards slightly with your hand, it should move the skin on your forehead with it, not slide easily over the top. If you find your hat comes down over your eyes when you jump or canter, this is usually easily remedied with a strip or two of 'legal' hat padding that we are able to send to you, in the back to grip the hat at the base of the skull more.
Hats are now available in many designs from the classic velvet hat associated with dressage and showing, the skull which we see on jockeys and cross country riders and the ventilated hats which are so popular with the showjumpers. If you have any questions regarding any of our hats please call us and we will be happy to help.
|
HEAD CIRCUMFERENCE (cm) |
HAT SIZES | SKULL SIZES |
| 49 | 6 | 000 |
| 50 | 6 1/8 | 000 1/2 |
| 51 | 6 1/4 | 00 |
| 52 | 6 3/8 | 00 1/2 |
| 53 | 6 1/2 | 0 |
| 54 | 6 5/8 | 0 1/2 |
| 55 | 6 3/4 | 1 |
| 56 | 6 7/8 | 1 1/2 |
| 57 | 7 | 2 |
| 58 | 7 1/8 | 2 1/2 |
| 59 | 7 1/4 | 3 |
| 60 | 7 3/8 | 3 1/2 |
| 61 | 7 1/2 | 4 |
| 62 | 7 5/8 | 4 1/2 |
| 63 | 7 3/4 | 5 |
| 64 | 7 7/8 | 5 1/2 |
| 65 | 8 | 6 |
How to measure for long boots and chaps/gaiters
We stock a large range of long leather riding boots which all have their own size charts below. Thankfully getting your measurements is the same regardless of the brand of boot! Follow the instructions below as accurately as possible and then consult the corresponding size chart. Remember whether fitting long boots or gaiters the rules are the same - as tight and tall as possible. Leather will inevitably stretch and crease to fit the shape and contours of your legs, so taking boots that are both tight and tall to start will ensure that once your leather has been 'broken in' you will not end up with short loose boots!
- Your foot size
- Calf size - In a standing position with feet flat to the floor, have a friend measure the widest part of your calf. Remember to wear your normal riding legwear and measure both calf muscles as the measurements may differ.
- Height of Boot/Chap - In a standing position, with bare feet and a slightly bent knee whilst keeping your feet flat to the floor, have a friend measure from the bottom of your heel to the centre of the knee crease.
Now all you have to do is take the measurement from your calf and the height you require and match it to your chosen chart.
Ariat Tall Boot Sizing Charts
Women's Tall Boot US, UK and European Size Chart

Men's Tall Boot US, UK and European Size Chart

Half Chap Sizing Chart
Monaco, Crowne Pro, Close Contact, All Around III, Classic III, Stable & Terrain.

NOTE: Due to the inherent suppleness of leather and the construction of these chaps, the leather will stretch with wear. These chaps should fit very snugly upon initial fitting. Measure height from floor to back of knee in bare feet. For accuracy, it is important to measure the widest part of calf with riding apparel to be worn.